
Introduction
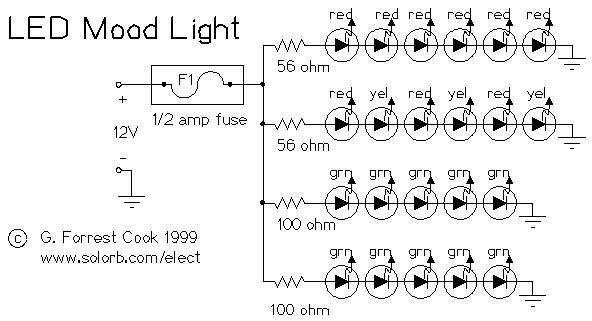
This circuit makes a nice lamp that consumes little power, runs cool, and has an incredibly long lifetime. The lamp puts out a warm yellow shade of light, the color may be adjusted by changing the number of red or green LED strings.
Specifications
- Operating Voltage: 12V DC
- Operating Current: 80ma approx.
Theory
The current flows and the LEDs light. There are 4 series strings of LEDs in this circuit, the resistors limit the current through the LEDs and prevent them from burning up. The resistors were adjusted to get approximately 20ma through each string. Different LED colors will have different voltage drops and resulting current flows. These resistor values will work fine at 12V.
Construction
The circuit was mounted in a plastic 35MM photographic slide box with a translucent plastic top (not shown). A piece of perforated board was cut to fit inside of the slide box, the LEDs and resistors were inserted through the holes in the board and the wires were soldered together on the back side of the board. It is recommended that you use a heat sink on the LED leads while you solder them, LEDs are very heat sensitive. A length of speaker wire was used to connect the lamp to the power source. The circuit board was connected to the plastic box with one 6-32 screw and several 6-32 nuts were used as spacers.
Alignment
None required
Use
Connect this circuit to a 12V battery or power supply, it puts out a nice glow that won’t affect your night vision too much. You can read by this light if you use it at close range.
Parts
- 10x green LEDs, T1-3/4 size
- 9x red LEDs, T1-3/4 size
- 3x yellow LEDs, T1-3/4 size
- 2x 100 ohm 1/2 W resistors
- 1x 56 ohm 1/2 W resistor
- 1x 62 ohm 1/2 W resistor (can also be 56 ohm, it’s what I had on hand)
- 1x 1/2 Amp 28VDC fuse
- 1x Plastic box with diffused (blurry) top, I used a 35mm slide box.
- 1x 6-32 3/8" screw
- 2x 6/32 nuts
Sources
- Forrest Cook http://www.solorb.com/elect/